My brother and SIL have decided on a Precious Moments/Noah's Ark theme and would you believe that not one place locally, that I could find, carried any scrapbook paper in this line?!?! Oh well, moving right along to Plan B. About two years ago I bought a couple of cheap signs from the Dollar Store and was going to turn them into something...well two years later I am finally doing just that with one. HA!
I grabbed the sign, a plastic drop cloth and Heirloom White spray paint (I heart you). This color is so creamy...just like melted vanilla ice-cream. Delish! Tip: remove the wire hanger before you paint unless you plan on using it.
Two coats later and it looks like this, well on the backside it does. You see those fun little ghosts and windows in the above picture, well they don't cover well unless you have primer and well...I didn't. So I flipped the bugger over and painted the backside. Voila-crisis averted!
Once it was dry then it is time to apply scrapbook paper. I decided to use strong spray adhesive. I never have used this before and well I am waaay too impatient to read directions. Long story short, if you use this stuff make sure you read the directions carefully and be certain to work swiftly and precisely. I didn't and there a a few snafu's but I was cookin' up a fix for those. Next time however, I will use my trusty Modge Podge. By the way, I am just dieing over this paper!! The apple green and blue combo is fan-freakin-tastic!
I angled my paper so it was a "diamond" shape over the sign. You can play with this however it suites you. Then rub it on your sign and make sure it is smooth and air bubble free. The spray adhesive takes about 30 min to dry so I played around with my Silhouette. This baby ROCKS!!
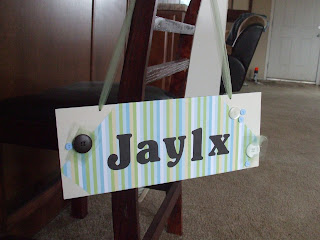
I made vinyl lettering with the bambino's name, in chocolate brown, and placed it on the scrapbook paper.
It still needed something extra and besides there were those few blunders that needed fixin'. So I found some extra buttons (get it...babies are as cute as buttons-ha!) and hot glued them on. The brown button and the large white button in the opposite corner also have a couple pieces of green tulle under them for added texture.
To emphasize the tulle and bring the whole project into a more cohesive look, I decided to use more green tulle for the hanger.
I love it and I sure hope the new parents-to-be will be thrilled with it also.


